
Overview of the Function
This tutorial will guide you through the steps required to send and receive data using the Accountant Data Assistant in Sage Pastel Partner. This function is essential for organizations that have internal accounts personnel, such as bookkeepers, who prepare initial financial records up to the trial balance, and external accountants who finalize the accounts, make corrections, and produce reports using the data compiled by the bookkeeper.
The Accountant Data Assistant allows:
- Sending a full backup of the company data.
- Restoring a full backup of the company data.
- Importing the GAAP Category Allocations and Journal Batches.
We will focus on the first two parts: sending and restoring a full backup of the company data.
Part 1: Sending a Full Backup of the Company Data
Step-by-Step Guide
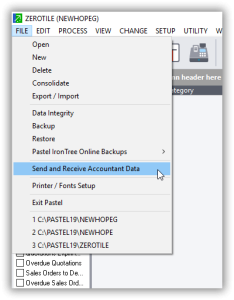
- Access the Function
- Click on
Filein the main menu. - Select
Send and Receive Accountant Data Assistant.
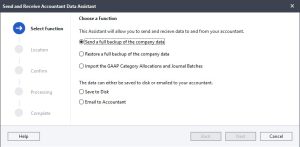
- Click on
Send a Full Backup of the Company Data
-
- Click on
Send a full backup of the company data. - You will see two methods to send the data:
Save to diskEmail to accountant
- Click on
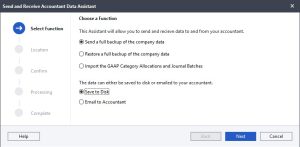
Method 1: Save to Disk
- Select Save to Disk
- Choose
Save to diskand clickNext.
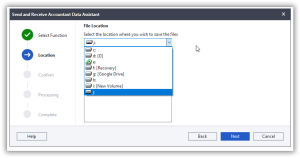
- Choose
Select Drive
- In the next window, select the drive where you want to save the backup file by clicking the drop-down arrow.
- Click
Next.
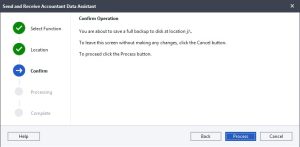
Confirm Operation
- You will be taken to the confirm operation window. Read through the notes.
- Click
Process.
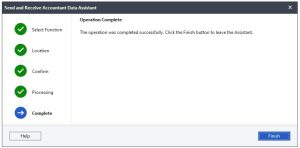
Operation Complete
- The operation will run, and you will be taken to the operation complete window.
- Click
Finish.
Send Backup via Email
- Use your normal email services to send the saved backup file as an attachment to the accountant.
Method 2: Email to Accountant
- Select Email to Accountant
- Choose
Email to accountantand clickNext.
- Choose
- Enter Email Details
- Write in the email address of the receiver, the subject, and the body of the email.
- Click
Next.
- Confirm Operation
- You will be taken to the confirm operation window. Read through the notes.
- Click
Process.
- Operation Complete
- The operation will run, and you will be taken to the operation complete window.
- Click
Finish.
Using either method, you will have successfully sent a full backup of your company data.
Part 2: Restoring a Full Backup of the Company Data
Step-by-Step Guide
- Access the Function
- Click on
Filein the main menu. - Select
Send and Receive Accountant Data Assistant.
- Click on
- Restore a Full Backup of the Company Data
- Click on
Restore a full backup of the company data. - Click
Next.
- Click on
- Select Drive with Backup Files
- In the next window, select the drive with your received backup files by clicking the drop-down arrow.
- The received backup files will appear in the window.
- Select the file you want to restore and click
Next.
- Confirm Operation
- You will be taken to the confirm operation window. Read through the notes.
- Click
Process.
- Warning
- A warning will appear stating that you are about to do a restore. Click
OK.
- A warning will appear stating that you are about to do a restore. Click
- Operation Complete
- The process will run, and once complete, click
Finish.
- The process will run, and once complete, click
- Log into Restored Company
- You will be prompted to log into the restored company.
- Enter your password and click
OK.
You are now ready to work with the restored data.
Conclusion
By following these steps, you can effectively use the Send and Receive Accountant Data Assistant to manage your financial data exchange between the bookkeeper and the accountant. This ensures that your financial records are accurately maintained and finalized, facilitating smooth and efficient accounting processes within your organization.
